- TKEStack版本:v1.6.0
DevOps on TKEStack
1. TKEStack部署
1.1 部署架构
产品架构图:(从https://tkestack.github.io/docs/installation/installation-architecture.html引用)

架构说明:
TKEStack 采用了 Kubernetes on Kubernetes 的设计理念。 即节点仅运行 Kubelet 进程,其他组件均采用容器化部署,由 Kubernetes 进行管理。
架构上分为Global集群和业务集群。 Global集群运行整个容器服务开源版平台自身所需要的组件,业务集群运行用户业务。 在实际的部署过程中,可根据实际情况进行调整。
1.2 部署模块
模块说明:
- Installer: 运行 tke-installer 安装器的节点,用于提供 Web UI 指导用户在 Global 集群部署TKEStacl控制台;
- Global Cluster: 运行的 TKEStack 控制台的 Kubernetes 集群;
- Cluster: 运行业务的 Kubernetes 集群,可以通过 TKEStack 控制台创建或导入;
- Auth: 权限认证组件,提供用户鉴权、权限对接相关功能;
- Gateway: 网关组件,实现集群后台统一入口、统一鉴权相关的功能,并运行控制台的 Web 界面服务;
- Platform: 集群管理组件,提供 Global 集群管理多个业务集群相关功能;
- Business: 业务管理组件,提供平台业务管理相关功能的后台服务;
- Network Controller:网络服务组件,支撑 Galaxy 网络功能;
- Monitor: 监控服务组件,提供监控采集、上报、告警相关服务;
- Notify: 通知功能组件,提供消息通知相关的功能;
- Registry: 镜像服务组件,提供平台镜像仓库服务;
1.3 配置安装
初始化install节点
arch=amd64 version=v1.6.0 && wget https://tke-release-1251707795.cos.ap-guangzhou.myqcloud.com/tke-installer-linux-$arch-$version.run{,.sha256} && sha256sum --check --status tke-installer-linux-$arch-$version.run.sha256 && chmod +x tke-installer-linux-$arch-$version.run && ./tke-installer-linux-$arch-$version.run
Step.1 prefight
root: yes
available disk space(/opt):  44 GiB
available disk space(/var/lib):  44 GiB
Step.2 ensure docker is ok
command docker not find
install docker [doing]
docker/containerd
docker/docker-init
docker/ctr
docker/containerd-shim
docker/runc
docker/docker-proxy
docker/dockerd
docker/docker
‘res/docker.service’ -> ‘/etc/systemd/system/docker.service’
‘res/daemon.json’ -> ‘/etc/docker/daemon.json’
install docker [ok]
Step.3 load tke-installer image [doing]
3cb2494d9fa7: Loading layer  5.838MB/5.838MB
542c8c6e2ee3: Loading layer   2.56kB/2.56kB
24e96d67d700: Loading layer  2.048kB/2.048kB
f7d3524c5ddb: Loading layer  445.8MB/445.8MB
e112aad11236: Loading layer  3.184MB/3.184MB
262af19c61e1: Loading layer  7.906GB/7.906GB
281437fcca51: Loading layer  2.048kB/2.048kB
Loaded image: tkestack/tke-installer-amd64:v1.6.0
Step.3 load tke-installer image [ok]
Step.4 clean old data [doing]
find: ‘/opt/tke-installer/data/*’: No such file or directory
Step.4 clean old data [ok]
Step.5 start tke-installer [doing]
bb5a9e6334a5980bc575be37961f2ef3c921779a1a341daf7936feb77da9d2e6
Step.5 start tke-installer [ok]
Step.6 check tke-installer status [doing]
Step.6 check tke-installer status [ok]
Please use your browser which can connect this machine to open http://127.0.0.1:8080/index.html
for install TKE!
打开http://:8080,根据部署界面提示安装
1.4 CoreDNS调优
Coredns性能优化 - 开启autopath插件
# cat coredns-cm.yaml
apiVersion: v1
kind: ConfigMap
metadata:
  name: coredns
  namespace: kube-system
data:
  Corefile: |
    .:53 {
        cache 30
        errors
        forward . /etc/resolv.conf
        health
        kubernetes cluster.local in-addr.arpa ip6.arpa
        loadbalance
        loop
        prometheus :9153
        autopath @kubernetes
        ready
        reload
        rewrite name default.registry.xxx.com tke-registry-api.tke.svc.cluster.local
    }
    xxx.com:53 {
        errors
        cache 30
        forward . 12.1.8.6
    }
1.5 local-pvc-provisioner部署
这里采用local-pvc-provisioner, 有其它的存储更好了,比如说:ceph、nfs.
# wget -c https://raw.githubusercontent.com/kubernetes-sigs/sig-storage-local-static-provisioner/master/deployment/kubernetes/example/default_example_provisioner_generated.yaml
这里fsType: xfs, dockerhub上有local-volume-provisioner镜像docker pull googleimages/local-volume-provisioner:v2.4.0,可能无法访问gcr.io镜像仓库地址
部署local-volume-provisioner
# kubectl apply -f default_example_provisioner_generated.yaml

# kubectl  get ds
NAME                       DESIRED   CURRENT   READY   UP-TO-DATE   AVAILABLE   NODE SELECTOR   AGE
local-volume-provisioner   1         1         1       1            1           <none>          12m

# kubectl  get pod
NAME                              READY   STATUS    RESTARTS   AGE
local-volume-provisioner-nrww4    1/1     Running   0          12m
创建local-volume-storageclass
# kubectl apply -f - << EOF
kind: StorageClass
apiVersion: storage.k8s.io/v1
metadata:
  name: fast-disks
provisioner: kubernetes.io/no-provisioner
volumeBindingMode: WaitForFirstConsumer
EOF

#设置为默认storageclass
# kubectl patch storageclass fast-disks -p '{"metadata": {"annotations":{"storageclass.kubernetes.io/is-default-class":"true"}}}'
local-volume-provisioner默认的可发现目录(discovery directory)是/mnt/fast-disks,挂载到这里的目录必须是mount进来,手动创建目录是不会被自动转换为PV的
mkdir -p /opt/k8s/localpv/{sda,sdb,sdc}
mkdir -p /mnt/fast-disks/{sda,sdb,sdc}
mount --bind /opt/k8s/localpv/sda /mnt/fast-disks/sda
mount --bind /opt/k8s/localpv/sdb /mnt/fast-disks/sdb
mount --bind /opt/k8s/localpv/sdc /mnt/fast-disks/sdc
创建pod,验证local-pv
# kubectl apply -f - << EOF
kind: PersistentVolumeClaim
apiVersion: v1
metadata:
  name: pvc-local
spec:
  accessModes:
  - ReadWriteOnce
  resources:
    requests:
      storage: 5Gi
  storageClassName: fast-disks
---
apiVersion: v1
kind: Pod
metadata:
  name: pv-local-pod
spec:
  volumes:
  - name: example-pv-local
    persistentVolumeClaim:
      claimName: pvc-local
  containers:
  - name: example-pv-local
    image: nginx
    ports:
    - containerPort: 80
    volumeMounts:
    - mountPath: /usr/share/nginx/html
      name: example-pv-local
EOF
# kubectl get pod nginx-c48bdb85c-clbtt
NAME                    READY   STATUS    RESTARTS   AGE
nginx-c48bdb85c-clbtt   1/1     Running   0          4d23h

# kubectl get pvc pvc-local
NAME        STATUS   VOLUME              CAPACITY   ACCESS MODES   STORAGECLASS   AGE
pvc-local   Bound    local-pv-ffd50f12   208Gi      RWO            fast-disks     46s
1.6 helm-push插件安装
helm-push插件离线安装
# wget -c https://github.com/chartmuseum/helm-push/releases/download/v0.9.0/helm-push_0.9.0_linux_amd64.tar.gz
# mkdir -p $HOME/.local/share/helm/plugins/helm-push
# tar xf helm-push_0.9.0_linux_amd64.tar.gz -C $HOME/.local/share/helm/plugins/helm-push/
2. DevOps体系构建
2.1 整体架构
 jenkins+gitlab+argocd的组合,就可以构建出完美的devops流程体系.
- gitlab负责存放代码;
- jenkins负责编译构建、创建argo-cd app;
- argo-cd负责更新k8s集群的资源
2.2 jenkins简介
引用至https://blog.csdn.net/houyefeng/article/details/50912756
Jenkins是一个开源的、提供友好操作界面的持续集成(CI)工具,起源于Hudson(Hudson是商用的), 主要用于持续、自动的构建/测试软件项目、监控外部任务的运行(这个比较抽象,暂且写上,不做解释)。 Jenkins用Java语言编写,可在Tomcat等流行的servlet容器中运行,也可独立运行。 通常与版本管理工具(SCM)、构建工具结合使用;常用的版本控制工具有SVN、GIT,构建工具有Maven、Ant、Gradle。
这里需要安装的jenkins插件有:
- Gitlab Hook
- Build With Parameters
- Git Parameter Plug-In
- Image Tag Parameter Plugin
- Credentials Plugin
2.3 gitLab简介
引用至https://zh.wikipedia.org/wiki/GitLab
GitLab 是由 GitLab Inc.开发,一款基于 Git 的完全集成的软件开发平台(fully 集成软件 development platform)。 另外,GitLab 且具有wiki以及在线编辑、issue跟踪功能、CI/CD 等功能。
Gitlab官方架构图:
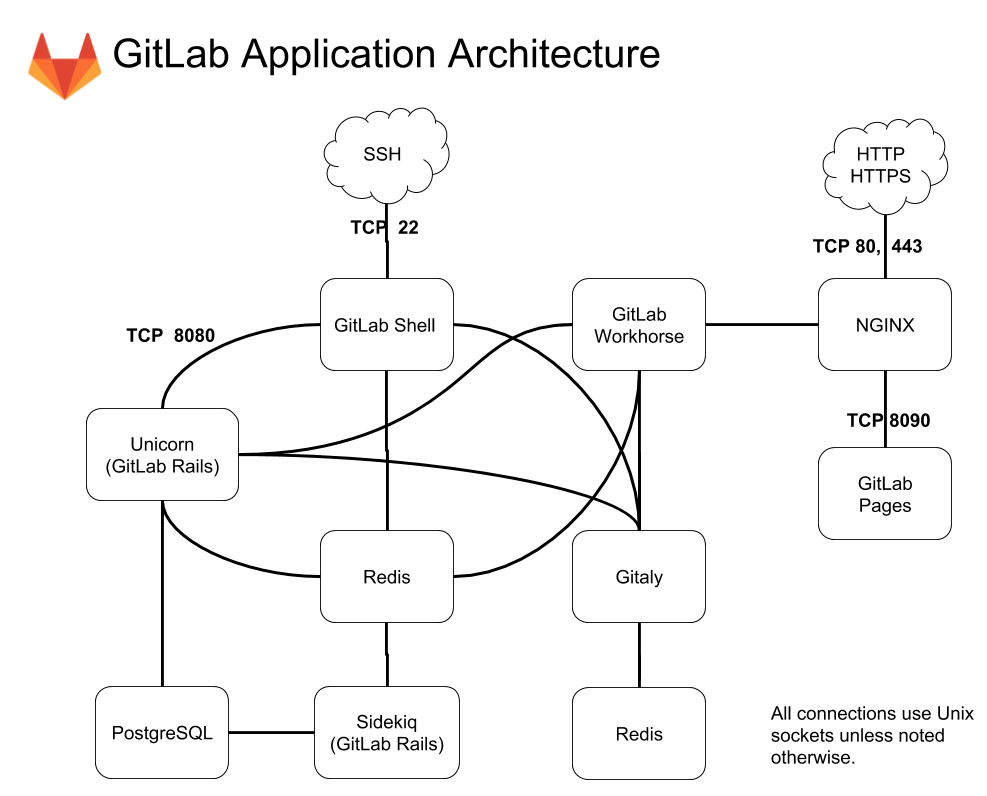
Gitlab组件说明:引用至https://chegva.com/3229.html
-
repository:代码库,可以是硬盘或 分布式文件系统
-
Nginx:Web 入口
-
gitlab-workhorse:轻量级反向代理服务器,可以处理一些大的HTTP请求(磁盘上的 CSS、JS 文件、文件上传下载等),处理 Git Push/Pull 请求,处理到Rails 的连接会反向代理给后端的unicorn(修改由 Rails 发送的响应或发送给 Rails 的请求,管理 Rails 的长期 WebSocket 连接等)。
-
gitlab-shell:用于 SSH 交互,而不是 HTTP。gitlab-shell 通过 Redis 与 Sidekiq 进行通信,并直接或通过 TCP 间接访问 Unicorn。用于处理Git命令和修改authorized keys列表
-
Unicorn:Gitlab 自身的 Web 服务器(Ruby Web Server),包含了 Gitlab 主进程,负责处理快速/一般任务,与 Redis 一起工作,配置参考:CPU核心数 + 1 = unicorn workers数量。工作内容包括:
-
通过检查存储在 Redis 中的用户会话来检查权限
-
为 Sidekiq 制作任务
-
从仓库(warehouse)取东西或在那里移动东西
-
-
Redis:缓存每个客户端的sessions和后台队列,负责分发任务。Redis需求的存储空间很小,大约每个用户25KB
-
Gitaly:后台服务,专门负责访问磁盘以高效处理 gitlab-shell 和 gitlab-workhorse 的git 操作,并缓存耗时操作。所有的 git 操作都通过 Gitaly 处理,并向 GitLab web 应用程序提供一个 API,以从 git(例如 title, branches, tags, other meta data)获取属性,并获取 blob(例如 diffs,commits,files)
-
Sidekiq:后台核心服务,可以从redis队列中提取作业并对其进行处理。后台作业允许GitLab通过将工作移至后台来提供更快的请求/响应周期。Sidekiq任务需要来自Redis
-
数据库(PostgreSQL/MySQL):包含以下信息:
-
repository 中的数据(元数据,issue,合并请求 merge request 等)
-
可以登录 Web 的用户(权限)
-
-
mail_room:处理邮件请求。回复 GitLab 发出的邮件时,GitLab 会调用此服务处理Sidekiq、Unicorn 和 GitLab-shell 的任务
-
logrotate:日志文件管理,切割
2.4 argo-cd简介
引用至https://zhuanlan.zhihu.com/p/140052719
Argo CD是一个基于Kubernetes的声明式GitOps持续交付工具。argo-cd功能有:
- 将应用程序自动部署到指定的目标环境
- 支持多种配置管理/模板工具(Kustomize、Helm、Ksonnet、Jsonnet、plain-YAML)
- 能够管理和部署到多个集群
- SSO集成(OIDC, OAuth2, LDAP, SAML 2.0, GitHub, GitLab, Microsoft, LinkedIn)
- 授权的多租户和RBAC策略
- 回滚/回滚到Git存储库中提交的任何应用程序配置
- 应用程序资源的健康状态分析
- 自动配置漂移检测和显示
- 将应用程序自动或手动同步到所需的状态
- Web UI,提供应用程序活动的实时视图
- 用于自动化和CI集成的CLI
- Webhook集成(GitHub, BitBucket, GitLab)
- 用于自动化的访问令牌
- PreSync、Sync、PostSync钩子支持复杂的应用程序发布(例如,blue/green & canary升级)
- 应用程序事件和API调用的审计跟踪
- Prometheus指标
- 在Git中重写ksonnet/helm参数的参数覆盖
2.5 argo-cd部署
安装部署
# kubectl create namespace argocd
# kubectl apply -n argocd -f https://raw.githubusercontent.com/argoproj/argo-cd/stable/manifests/install.yaml
2.6 Dockerfile范例
gitlab的ssh私钥放到Jenkins slave节点上
# Building stage
FROM maven:3.5.4-jdk-8-alpine as builder

WORKDIR /usr/src/dev

# Source code, building tools and dependences
COPY settings.xml /usr/share/maven/ref/
COPY . /usr/src/dev

ENV TIMEZONE "Asia/Shanghai"

RUN mvn -B -f pom.xml -s /usr/share/maven/ref/settings.xml clean install
RUN ls /usr/src/dev-xxx/target/

# Production stage
FROM openjdk:8-jre-slim
WORKDIR /java/bin

# copy the go binaries from the building stage
COPY --from=builder /usr/src/dev/target/xxx.jar /java/bin

# copy the config files from the current working dir

EXPOSE 80
ENTRYPOINT ["java", "-jar", "xxx.jar"]
Dockerfile两步编译阶段,第一个编译阶段利用maven镜像编译出来的产物复制给第二个编译阶段
2.7 Jenkinsfile范例
Slave节点预装了argocd客户端,配置gitlab ssh密钥互信
# tree ci
ci
├── Build.sh
├── Clean.sh
├── Common.sh
├── Deliver.sh
├── Jenkinsfile
└── Update.sh
Jenkinsfile文件
# cat ci/Jenkinsfile
node {

  def APP_GIT_URL='git@git.xxx.com:xxx/dev-xxx.git'
  def GIT_CREDENTIALSID='gitlab_ssh'

  stage ('Checkout') {
    checkout([$class: 'GitSCM', branches: [[name: "${params.BRANCH_OR_TAG}"]], extensions: [[$class: 'LocalBranch', localBranch: "${params.BRANCH_OR_TAG}"],[$class: 'SubmoduleOption', disableSubmodules: false, parentCredentials: true, recursiveSubmodules: true, reference: '', trackingSubmodules: true]], userRemoteConfigs: [[credentialsId: "${GIT_CREDENTIALSID}", url: "${APP_GIT_URL}"]]])
    sh 'chmod a+x ./ci/*.sh'
  }

  stage ('Build') {
    sh './ci/Build.sh'
  }

  stage ('Update') {
    sh './ci/Update.sh'
  }

  stage ('Deliver') {
    sh './ci/Deliver.sh'
  }

  stage ('Cleanup') {
    sh './ci/Clean.sh'
    deleteDir()
  }
}
Build.sh文件
# cat ci/Build.sh
#!/bin/bash

set -x

BASEDIR=$(dirname "$0")
source ${BASEDIR}/Common.sh

#lgoin
docker login -u ${IMAGE_REGISTRY_USER} -p ${IMAGE_REGISTRY_PASS} ${IMAGE_REGISTRY}

#build
docker build -t ${IMAGE_REGISTRY}/${IMAGE_NAME}:${IMAGE_TAG} -f ./Dockerfile .

#push
docker push ${IMAGE_REGISTRY}/${IMAGE_NAME}:${IMAGE_TAG}

#rm image
docker rmi -f ${IMAGE_REGISTRY}/${IMAGE_NAME}:${IMAGE_TAG}
Update.sh文件
# cat ci/Update.sh
#!/bin/bash

set -x

BASEDIR=$(dirname "$0")
source ${BASEDIR}/Common.sh

#git clone
git clone git@git.xxx.com:xxx/xxx_manifest.git
cd lls_manifest/

#replace image tag
sed -i -r "s;image:(.*);image: \"${IMAGE_NAME}:${IMAGE_TAG}\";g" dev-xxx/dev-xxx-dep.yaml

#git push
git config --global user.name "Administrator"
git config --global user.email "test@xxx.com"
git commit -am "${JOB_NAME}-${BUILD_TAG} image update"
git push
Deliver.sh文件
# cat ci/Deliver.sh
#!/bin/bash

set -x

BASEDIR=$(dirname "$0")
source ${BASEDIR}/Common.sh

#login
argocd login argocd.xxx.com:32080 \
       --username admin \
       --password admin \
       --insecure \
       --plaintext

#create app
argocd app create test-dev-xxx \
         --repo https://git.xxx.com/xxx/xxx_manifest.git \
         --path dev-xxx \
         --dest-server https://kubernetes.default.svc \
         --dest-namespace devops \
         --sync-policy automated \
         --grpc-web \
         --auto-prune
Common.sh文件
# cat ci/Common.sh
IMAGE_REGISTRY="default.registry.xxx.com"
IMAGE_REGISTRY_USER="tkestack"
IMAGE_REGISTRY_PASS="eyJhbGciOiJSUzI1NiIsInR5cCI6IkpXVCJ9.xxx"
IMAGE_NAME="devops/dev-xxx"
GIT_COMMIT_ID=`git describe --always --tags | sed 's/-/./2' | sed 's/-/./2'`
IMAGE_TAG=${GIT_COMMIT_ID:-'latest'}
Clean.sh文件
# cat ci/Clean.sh
#!/bin/bash
2.8 更适合api对接的Jenkinsfile范例
脚本式流水线范例:(Jenkins 2.x版本之前)
MANIFEST_GIT_URL、IMAGE_REGISTRY、ARGOCD_URL在Jenkins全局变量那边声明,xxx_CREDENTIALSID在Jenkins全局凭证那边配置
cat Jenkinsfile
node {
  def APP_GIT_URL='git@git.xxx.com:xxx/dev-xxx.git'
  def APP_NAMESPACE="devops"
  def APP_NAME="dev-xxx"
  def APP_DEPLOY_ENV="dev"

  def GIT_CREDENTIALSID='gitlab_ssh'
  def IMAGE_REGISTRY_CREDENTIALSID='registry_auth'
  def ARGOCD_CREDENTIALSID='argocd_auth'

  def MANIFEST_GIT_URL="${MANIFEST_GIT_URL}"
  def BRANCH_OR_TAG="${params.BRANCH_OR_TAG}"

  def ARGOCD_URL="${ARGOCD_URL}"
  def IMAGE_REGISTRY="${IMAGE_REGISTRY}"

  env.IMAGE_TAG="${params.IMAGE_TAG}"

  stage ('Checkout') {
    checkout([$class: 'GitSCM', branches: [[name: "${BRANCH_OR_TAG}"]], extensions: [[$class: 'LocalBranch', localBranch: "${BRANCH_OR_TAG}"],[$class: 'SubmoduleOption', disableSubmodules: false, parentCredentials: true, recursiveSubmodules: true, reference: '', trackingSubmodules: true]], userRemoteConfigs: [[credentialsId: "${GIT_CREDENTIALSID}", url: "${APP_GIT_URL}"]]])

    if ("${env.IMAGE_TAG}" == "") {
        env.IMAGE_TAG = "${sh(script:'git rev-parse --short HEAD', returnStdout: true).trim()}"
    }
  }

  stage ('Build') {
    //login docker registry
    withCredentials([usernamePassword(credentialsId: "${IMAGE_REGISTRY_CREDENTIALSID}", usernameVariable: "IMAGE_REGISTRY_USER", passwordVariable: "IMAGE_REGISTRY_PASS")]){
      sh("docker login -u ${IMAGE_REGISTRY_USER} -p ${IMAGE_REGISTRY_PASS} ${IMAGE_REGISTRY}")
    }

    //build image
    sh("docker build -t ${IMAGE_REGISTRY}/${APP_NAMESPACE}/${APP_NAME}:${env.IMAGE_TAG} -f ./Dockerfile .")

    //push image
    sh("docker push ${IMAGE_REGISTRY}/${APP_NAMESPACE}/${APP_NAME}:${env.IMAGE_TAG}")

    //rm image
    sh("docker rmi -f ${IMAGE_REGISTRY}/${APP_NAMESPACE}/${APP_NAME}:${env.IMAGE_TAG}")
  }

  stage ('Update') {
    //git clone
    checkout([$class: 'GitSCM', branches: [[name: "*/master"]], extensions: [[$class: 'LocalBranch', localBranch: "master"],[$class: 'SubmoduleOption', disableSubmodules: false, parentCredentials: true, recursiveSubmodules: true, reference: '', trackingSubmodules: true]], userRemoteConfigs: [[credentialsId: "${GIT_CREDENTIALSID}", url: "${MANIFEST_GIT_URL}"]]])

    //replace image tag
    sh("sed -i -r 's;image:(.*);image: \"${APP_NAMESPACE}/${APP_NAME}:${env.IMAGE_TAG}\";g' ${APP_DEPLOY_ENV}/${APP_NAME}/${APP_NAME}-dep.yaml")

    //git push
    sh("git config --global user.name 'Administrator'")
    sh("git config --global user.email 'test@lls.com'")
    sh("git commit -am '${JOB_NAME}-${BUILD_TAG} image update'")
    sh("git push")
  }

  stage ('Deliver') {
    //login argo-cd server
    withCredentials([usernamePassword(credentialsId: "${ARGOCD_CREDENTIALSID}", usernameVariable: "ARGOCD_USER", passwordVariable: "ARGOCD_PASS")]){
      sh("argocd login ${ARGOCD_URL} \
        --username ${ARGOCD_USER} \
        --password ${ARGOCD_PASS} \
        --insecure \
        --plaintext \
        --grpc-web")
    }

    //create argo-cd app
    sh("argocd app create test-${APP_NAME} \
         --label env=${APP_DEPLOY_ENV} \
         --repo ${MANIFEST_GIT_URL} \
         --path ${APP_DEPLOY_ENV}/${APP_NAME} \
         --dest-server https://kubernetes.default.svc \
         --dest-namespace ${APP_NAMESPACE} \
         --sync-policy automated \
         --grpc-web \
         --auto-prune")
  }

  stage ('Cleanup') {
    deleteDir()
  }
}
声明式流水线范例:(Jenkins 2.x版本之后新增了声明式流水线语法)
//def ARGOCD_URL="${ARGOCD_URL}"
//def MANIFEST_GIT_URL="${MANIFEST_GIT_URL}"
//def IMAGE_REGISTRY="${IMAGE_REGISTRY}"
def IMAGE_TAG = ""

pipeline {
    agent {
        node {
          label ''
        }
    }
    //要输入的参数
    parameters {
        // Jenkins parameter
        string(
            name: 'APP_GIT_URL',
            defaultValue: '',
            description: 'Required: input app git repo url')
        gitParameter(
            name: 'BRANCH_OR_TAG',
            branchFilter: 'origin/(.*)',
            defaultValue: 'origin/master',
            tagFilter: '*',
            type: 'PT_BRANCH_TAG',
            description: 'Required: chose a branch you want')
        string(
            name: 'APP_NAME',
            defaultValue: '',
            description: 'Required: input app name')
        choice(
            name: 'APP_DEPLOY_ENV',
            choices: ['dev', 'product', 'test'],
            description: 'Required: input app deploy environment')
        string(
            name: 'IMAGE_TAG',
            defaultValue: '',
            description: 'Optional: input app image tag')
        string(
            name: 'APP_NAMESPACE',
            defaultValue: 'devops',
            description: 'Optional: input app namespace')
    }
    //全局凭证环境变量
    environment {
        ARGOCD_AUTH = credentials("argocd_auth")
        REGISTRY_AUTH = credentials("registry_auth")
        GITLAB_AUTH = credentials("gitlab")
        GIT_CREDENTIALSID="gitlab"
    }

    stages {
      //拉代码阶段
      stage ('Checkout') {
        steps {
          checkout([$class: 'GitSCM', branches: [[name: "${params.BRANCH_OR_TAG}"]], extensions: [[$class: 'LocalBranch', localBranch: "${params.BRANCH_OR_TAG}"],[$class: 'SubmoduleOption', disableSubmodules: false, parentCredentials: true, recursiveSubmodules: true, reference: '', trackingSubmodules: true]], userRemoteConfigs: [[credentialsId: "${env.GIT_CREDENTIALSID}", url: "${params.APP_GIT_URL}"]]])

          script {
            IMAGE_TAG = "${params.IMAGE_TAG}"

            //if not defined, use git last commit-id
            if ( "${IMAGE_TAG}" == "" ) {
               IMAGE_TAG = "${sh(script:'git rev-parse --short HEAD', returnStdout: true).trim()}"
            }
          }
        }
      }
      //构建阶段
      stage ('Build') {
        steps {
            //login docker registry
            sh("docker login -u ${REGISTRY_AUTH_USR} -p ${REGISTRY_AUTH_PSW} ${IMAGE_REGISTRY}")

            //build image
            sh("docker build -t ${IMAGE_REGISTRY}/${params.APP_NAMESPACE}/${params.APP_NAME}:${IMAGE_TAG} -f ./Dockerfile .")

            //push image
            sh("docker push ${IMAGE_REGISTRY}/${params.APP_NAMESPACE}/${params.APP_NAME}:${IMAGE_TAG}")

            //rm image
            sh("docker rmi -f ${IMAGE_REGISTRY}/${params.APP_NAMESPACE}/${params.APP_NAME}:${IMAGE_TAG}")
         }
      }
      //修改Manifest阶段
      stage ('Update') {
        steps {
            //git clone
            checkout([$class: 'GitSCM', branches: [[name: "*/master"]], extensions: [[$class: 'LocalBranch', localBranch: "master"],[$class: 'SubmoduleOption', disableSubmodules: false, parentCredentials: true, recursiveSubmodules: true, reference: '', trackingSubmodules: true]], userRemoteConfigs: [[credentialsId: "${env.GIT_CREDENTIALSID}", url: "https://${MANIFEST_GIT_URL}"]]])

            //replace image tag
            sh("sed -i -r 's;image:(.*);image: \"${params.APP_NAMESPACE}/${params.APP_NAME}:${IMAGE_TAG}\";g' ${params.APP_DEPLOY_ENV}/${params.APP_NAME}/${params.APP_NAME}-dep.yaml")
            sh("echo `date '+%Y-%m-%d_%H-%M-%S'` > ${params.APP_DEPLOY_ENV}/build_timestamp")

            //git push
            sh("git config --global user.name 'Administrator'")
            sh("git config --global user.email 'test@lls.com'")
            sh("git add --all")
            sh("git commit -am '${JOB_NAME}-${BUILD_TAG} image update'")
            sh("git push https://${GITLAB_AUTH_USR}:${GITLAB_AUTH_PSW}@${MANIFEST_GIT_URL}")
        }
      }
      //发布阶段
      stage ('Deliver') {
        steps {
            //login argo-cd server
            sh("argocd login ${ARGOCD_URL} \
                --username ${ARGOCD_AUTH_USR} \
                --password ${ARGOCD_AUTH_PSW} \
                --insecure \
                --plaintext \
                --grpc-web")


            //create argo-cd app
            sh("argocd app create test-${params.APP_NAME} \
                 --label env=${params.APP_DEPLOY_ENV} \
                 --repo https://${MANIFEST_GIT_URL} \
                 --path ${params.APP_DEPLOY_ENV}/${params.APP_NAME} \
                 --dest-server https://kubernetes.default.svc \
                 --dest-namespace ${params.APP_NAMESPACE} \
                 --sync-policy automated \
                 --grpc-web \
                 --auto-prune")
        }
      }
    }
    //清理阶段
    post {
        always {
          deleteDir()
        }
    }
}
2.9 配置gitlab webhook
Argo CD每三分钟轮询一次Git存储库,以检测清单的变化。为了消除轮询带来的延迟,可以将API服务器配置为接收Webhook事件。 Argo CD支持来自GitHub,GitLab,Bitbucket,Bitbucket Server和Gogs的Git Webhook通知
1、argocd配置gitlab webhook token
# kubectl -n argocd edit secret argocd-secret
apiVersion: v1
kind: Secret
metadata:
  name: argocd-secret
  namespace: argocd
type: Opaque
data:
...

stringData:
  # gitlab webhook secret
  webhook.gitlab.secret: admin
# kubectl -n argocd describe secret argocd-secret
Name:         argocd-secret
Namespace:    argocd
Labels:       app.kubernetes.io/component=server
              app.kubernetes.io/instance=argo-cd
              app.kubernetes.io/managed-by=Helm
              app.kubernetes.io/name=argocd-secret
              app.kubernetes.io/part-of=argocd
              helm.sh/chart=argo-cd-3.0.0
Annotations:  meta.helm.sh/release-name: argo-cd
              meta.helm.sh/release-namespace: argocd

Type:  Opaque

Data
====
admin.password:         60 bytes
admin.passwordMtime:    20 bytes
server.secretkey:       44 bytes
webhook.gitlab.secret:  5 bytes
2、gitlab仓库配置webhook
Settings ---> Webhooks ----> 配置URL(http://<Argo-cd-server地址>/api/webhook)
                       |
                       |---> 配置Secret Token(也写admin,跟argocd-secret中保持一致)
                       |
                       |---> 勾选Push Events
                       |
                       |---> 不勾选Enable SSL verification
                       |
                       |---> Test(执行,返回200即ok)
2.10 argo api
获取bearer token
$ curl $ARGOCD_SERVER/api/v1/session -d $'{"username":"admin","password":"password"}'
{"token":"eyJhbGciOiJIUzI1NiIsInR5cCI6IkpXVCJ9.eyJpYXQiOjE1Njc4MTIzODcsImlzcyI6ImFyZ29jZCIsIm5iZiI6MTU2NzgxMjM4Nywic3ViIjoiYWRtaW4ifQ.ejyTgFxLhuY9mOBtKhcnvobg3QZXJ4_RusN_KIdVwao"}
获取applications列表
$ curl $ARGOCD_SERVER/api/v1/applications -H "Authorization: Bearer $ARGOCD_TOKEN"
{"metadata":{"selfLink":"/apis/argoproj.io/v1alpha1/namespaces/argocd/applications","resourceVersion":"37755"},"items":...}
3. 应用发布策略
k8s默认Deployment资源支持两种发布策略:RollingUpdate和Recreate
- Recreate:直接重建,毫无平滑,通常用于单副本应用
- RollingUpdate:在完善的pod生命周期前提下,可以做到平滑;滚动更新一旦开始不可中断
Deployment还支持配置maxSurge、maxUnavailable控制渐进式版本升级过程,不支持版本发布的策略,如灰度发布、蓝绿发布;
Argo-rollout可以当作是Deployment的扩展,功能的完善,它支持.spec.strategy配置灰度、蓝绿发布策略。
3.1 A/B测试
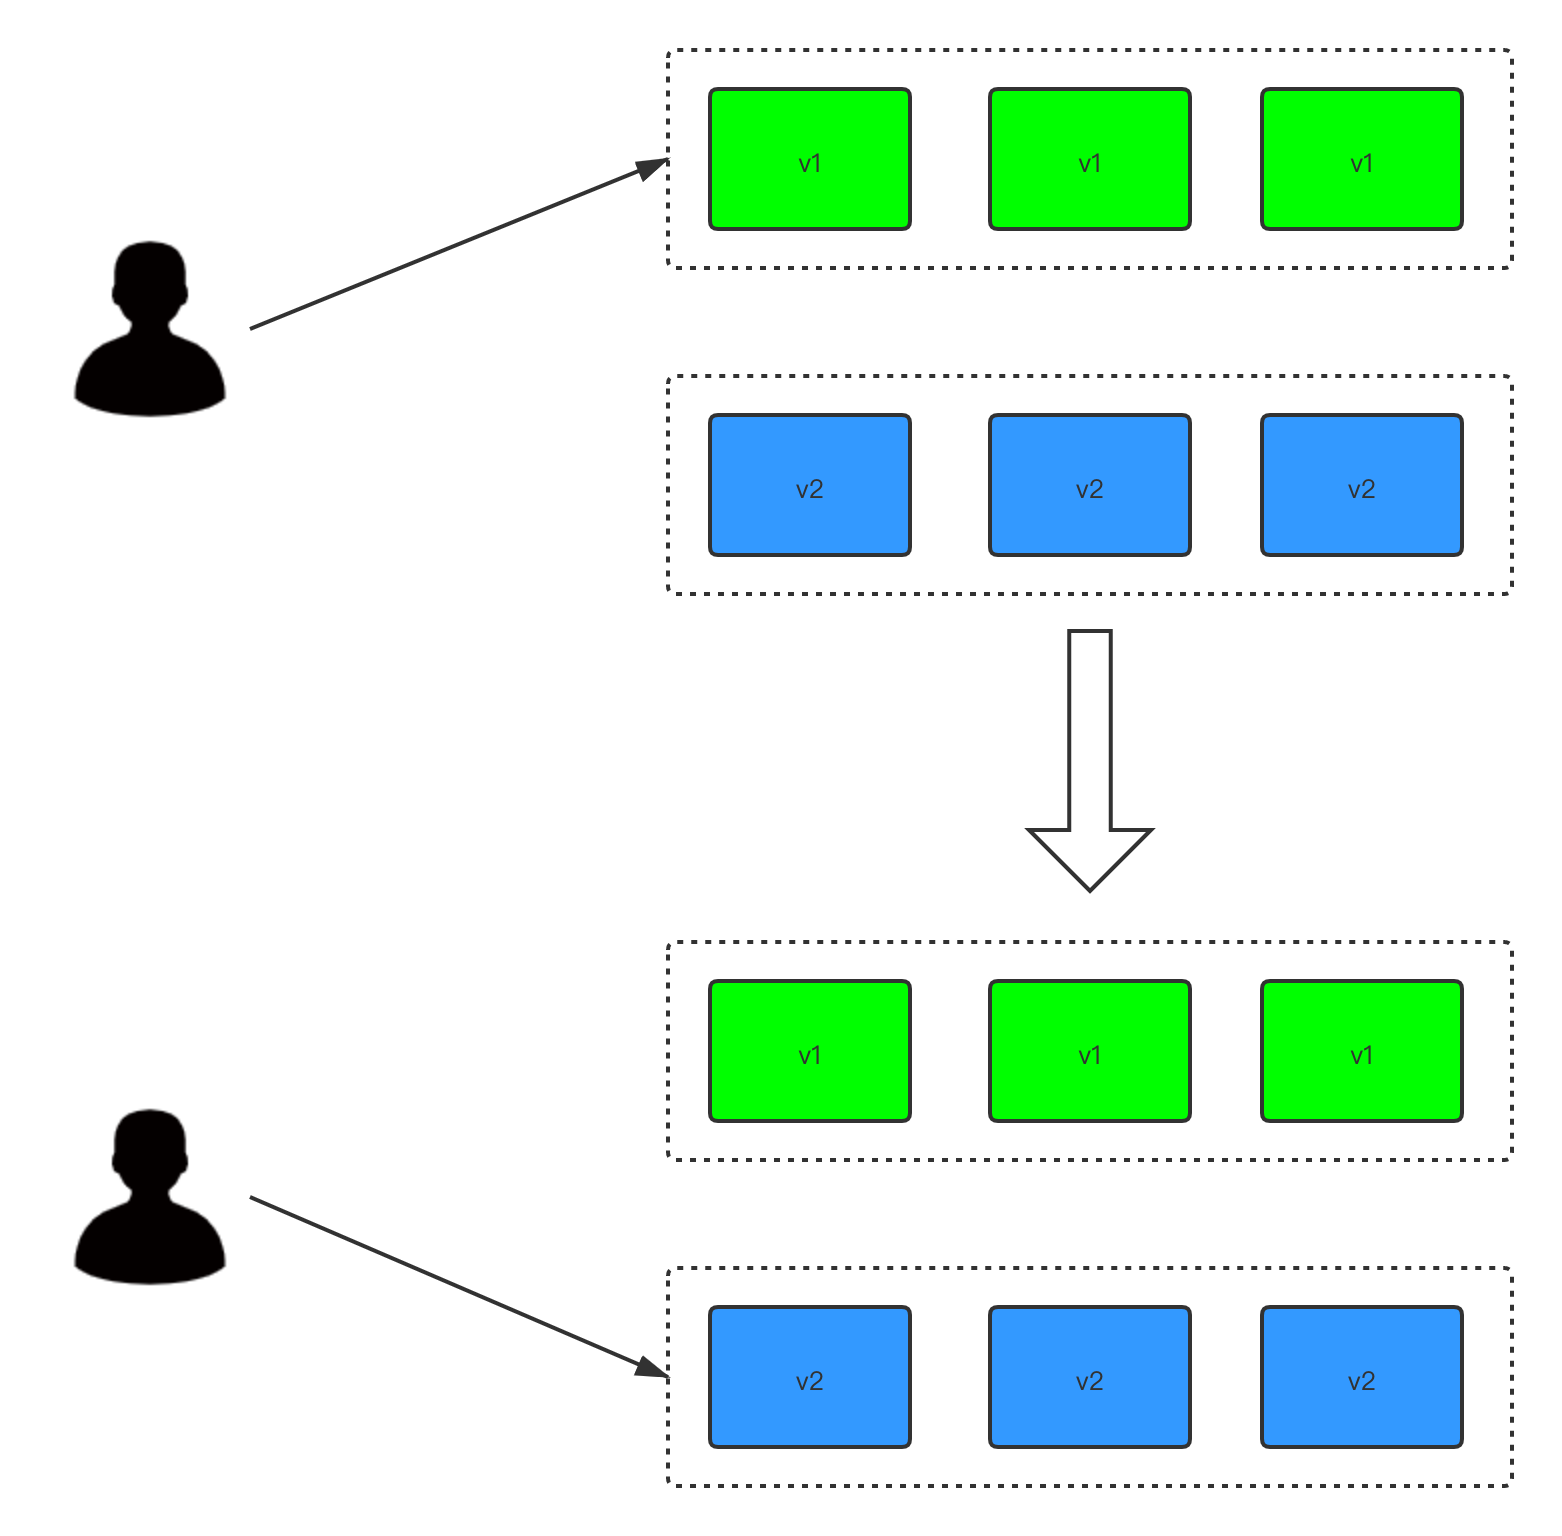
3.2 蓝绿发布
蓝绿发布:同时运行两个版本的应用,部署的时候,不停止v1老版本,等v2新版本运行起来后,再将全部流量切换到v2新版本上。由于需要同时运行两种版本的应用, 所需的资源也是原来的2倍
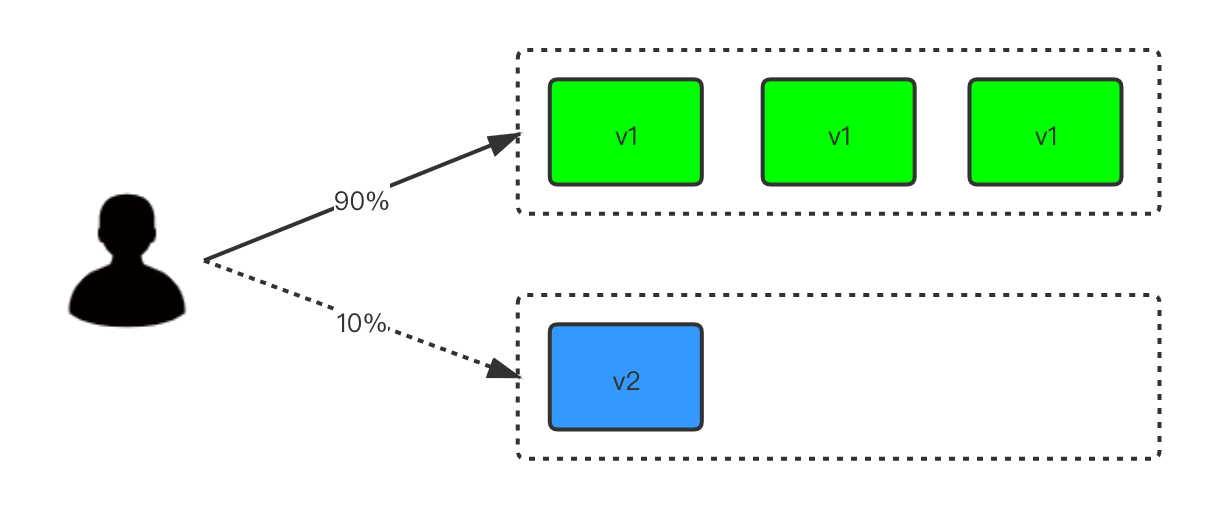
3.3 灰度/金丝雀发布
灰度发布:也称金丝雀发布,在灰度发布过程中,先启动一个v2新版本应用,并不直接把流量切到v2新版本上,先对这个v2新版本进行测试后,没有问题,把10%的流量 导向v2新版本;新版本运行正常后,再把所有流量切换到v2新版本上,最后停止v1旧版本
3.3 滚动发布
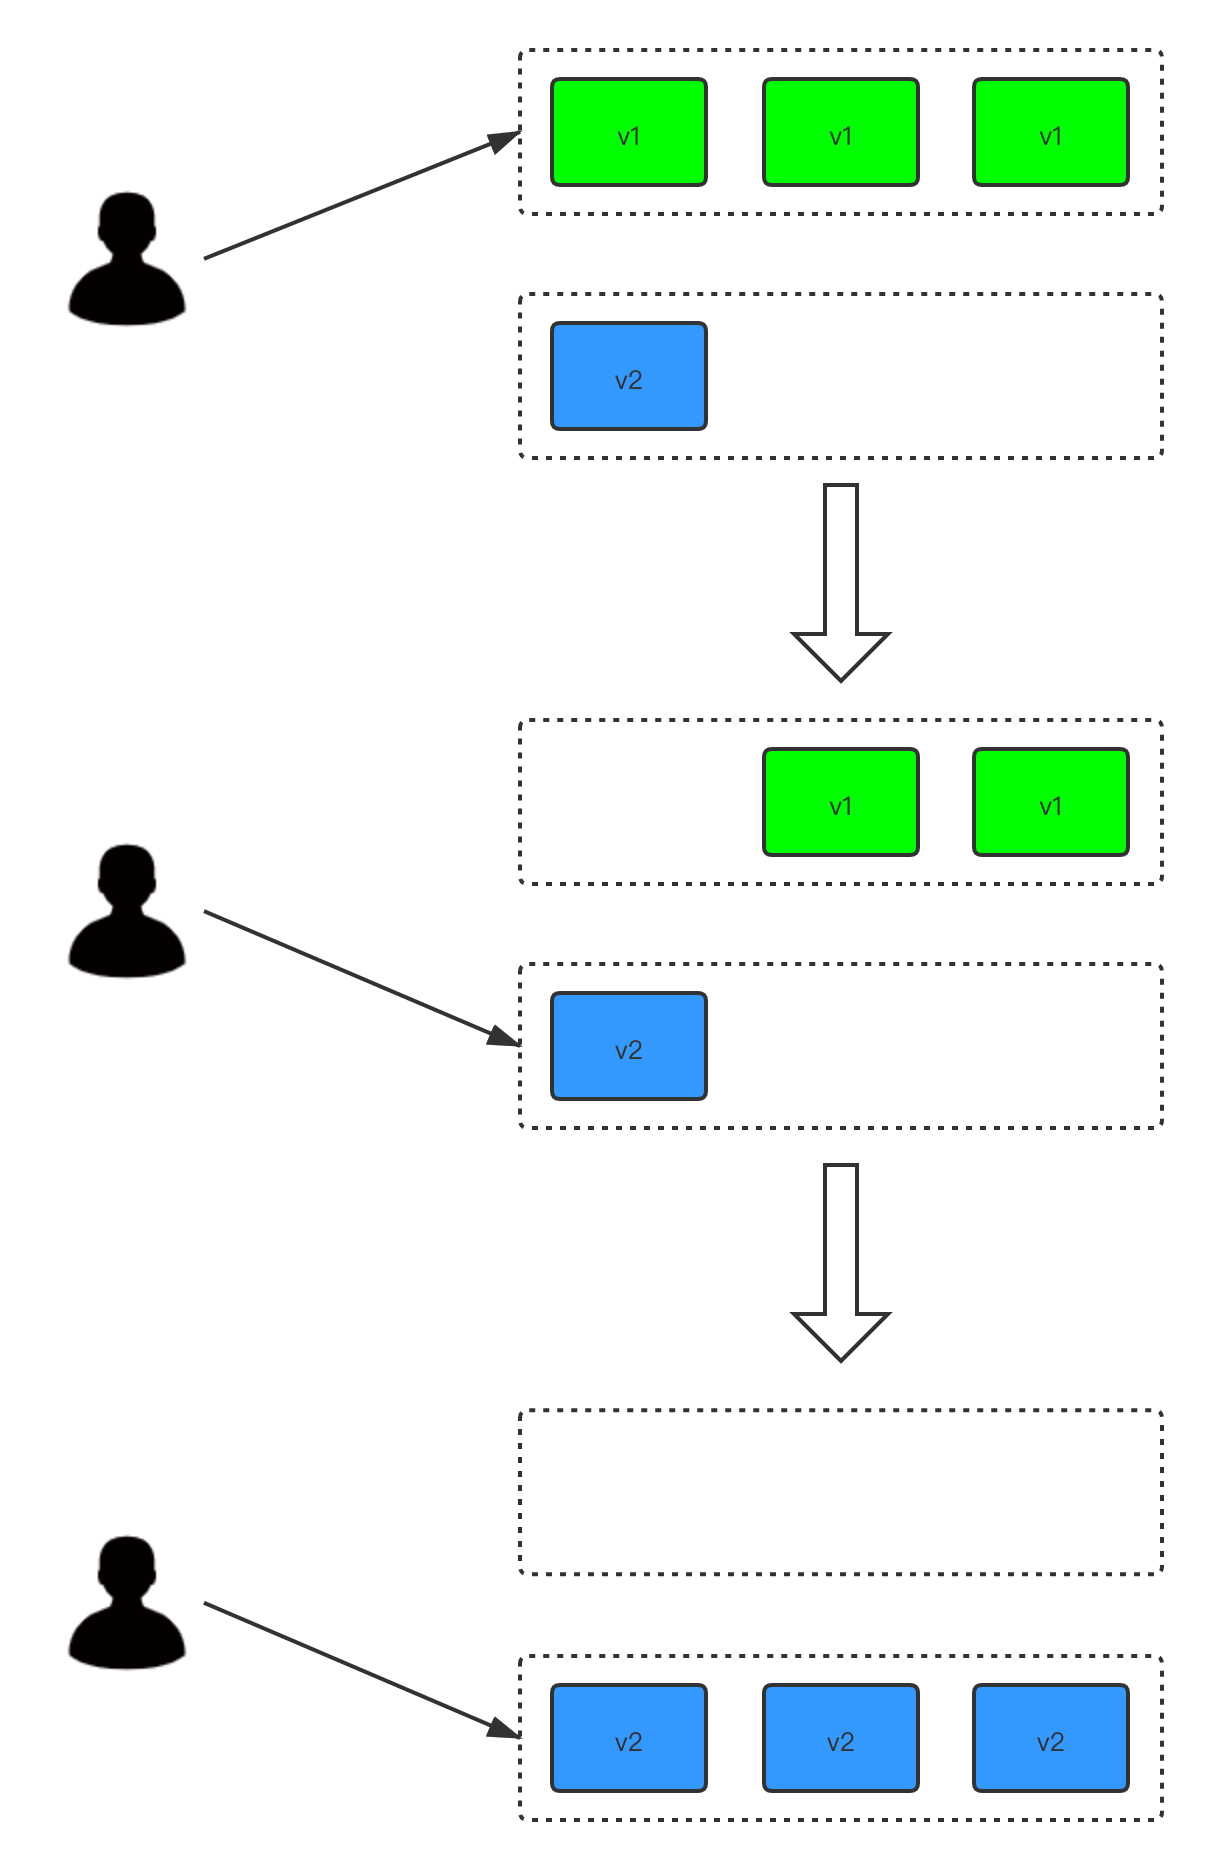
滚动发布:在滚动升级过程中,不是一下启动所有v2新版本,先启动一个v2新版本,再停止一个v1老版本,重复这样的过程,直到所有升级完成; 在滚动升级过程中,流量会到已经启动的v2新版本,但是不能保证v2新版本一定可用;滚动发布可以避免蓝绿发布所需资源翻倍的问题
3.4 红黑发布
3.5 argo-rollouts部署
argo-rollouts部署
# kubectl create namespace argo-rollouts
# kubectl apply -n argo-rollouts -f https://raw.githubusercontent.com/argoproj/argo-rollouts/stable/manifests/install.yaml
kubectl argo-rollouts插件
# curl -LO https://github.com/argoproj/argo-rollouts/releases/latest/download/kubectl-argo-rollouts-linux-amd64
# chmod +x ./kubectl-argo-rollouts-linux-amd64
# sudo mv ./kubectl-argo-rollouts-linux-amd64 /usr/local/bin/kubectl-argo-rollouts
# kubectl argo rollouts version
3.6 argo-rollouts蓝绿发布
spec.strategy指定为blueGreen,配置了两种service,一个是activeService,另一个是previewService,分别负责老版本和新版本的流量转发
# vim rollout-bluegreen.yaml
# This example demonstrates a Rollout using the blue-green update strategy, which contains a manual
# gate before promoting the new stack.
apiVersion: argoproj.io/v1alpha1
kind: Rollout
metadata:
  name: rollout-bluegreen
spec:
  replicas: 2
  revisionHistoryLimit: 2
  selector:
    matchLabels:
      app: rollout-bluegreen
  template:
    metadata:
      labels:
        app: rollout-bluegreen
    spec:
      containers:
      - name: rollouts-demo
        image: argoproj/rollouts-demo:blue
        imagePullPolicy: Always
        ports:
        - containerPort: 8080
  strategy:
    blueGreen:
      # activeService specifies the service to update with the new template hash at time of promotion.
      # This field is mandatory for the blueGreen update strategy.
      activeService: rollout-bluegreen-active
      # previewService specifies the service to update with the new template hash before promotion.
      # This allows the preview stack to be reachable without serving production traffic.
      # This field is optional.
      previewService: rollout-bluegreen-preview
      # autoPromotionEnabled disables automated promotion of the new stack by pausing the rollout
      # immediately before the promotion. If omitted, the default behavior is to promote the new
      # stack as soon as the ReplicaSet are completely ready/available.
      # Rollouts can be resumed using: `kubectl argo rollouts promote ROLLOUT`
      autoPromotionEnabled: false

---
kind: Service
apiVersion: v1
metadata:
  name: rollout-bluegreen-active
spec:
  selector:
    app: rollout-bluegreen
  ports:
  - protocol: TCP
    port: 80
    targetPort: 8080

---
kind: Service
apiVersion: v1
metadata:
  name: rollout-bluegreen-preview
spec:
  selector:
    app: rollout-bluegreen
  ports:
  - protocol: TCP
    port: 80
    targetPort: 8080
# kubectl apply -f rollout-bluegreen.yaml
rollout.argoproj.io/rollout-bluegreen created
service/rollout-bluegreen-active created
service/rollout-bluegreen-preview created

# kubectl argo rollouts list rollout
NAME               STRATEGY   STATUS        STEP  SET-WEIGHT  READY  DESIRED  UP-TO-DATE  AVAILABLE
rollout-bluegreen  BlueGreen  Healthy       -     -           2/2    2        2           2
更换镜像为rollouts-demo:yellow,查看rollout详情,在没执行promote命令active还是指向的是旧版本
# kubectl argo rollouts set image rollout-bluegreen "*=argoproj/rollouts-demo:yellow"
rollout "rollout-bluegreen" image updated

# kubectl argo rollouts get rollout  rollout-bluegreen
Name:            rollout-bluegreen
Namespace:       default
Status:          ◌ Progressing
Message:         active service cutover pending
Strategy:        BlueGreen
Images:          argoproj/rollouts-demo:blue (stable, active)
                 argoproj/rollouts-demo:yellow (preview)
Replicas:
  Desired:       2
  Current:       4
  Updated:       2
  Ready:         2
  Available:     2

NAME                                           KIND        STATUS               AGE   INFO
⟳ rollout-bluegreen                            Rollout     ◌ Progressing        5m7s
├──# revision:2
│  └──⧉ rollout-bluegreen-f4b655dcc            ReplicaSet  ◌ Progressing        2s    preview
│     ├──□ rollout-bluegreen-f4b655dcc-9zhr5   Pod         ◌ ContainerCreating  2s    ready:0/1
│     └──□ rollout-bluegreen-f4b655dcc-cf7g2   Pod         ◌ ContainerCreating  2s    ready:0/1
└──# revision:1
   └──⧉ rollout-bluegreen-5f49884f5c           ReplicaSet  ✔ Healthy            5m7s  stable,active
      ├──□ rollout-bluegreen-5f49884f5c-9d5xw  Pod         ✔ Running            5m7s  ready:1/1
      └──□ rollout-bluegreen-5f49884f5c-fh8zt  Pod         ✔ Running            5m7s  ready:1/1

# kubectl argo rollouts get rollout  rollout-bluegreen
Name:            rollout-bluegreen
Namespace:       default
Status:          ॥ Paused
Message:         BlueGreenPause
Strategy:        BlueGreen
Images:          argoproj/rollouts-demo:blue (stable, active)
                 argoproj/rollouts-demo:yellow (preview)
Replicas:
  Desired:       2
  Current:       4
  Updated:       2
  Ready:         2
  Available:     2

NAME                                           KIND        STATUS     AGE    INFO
⟳ rollout-bluegreen                            Rollout     ॥ Paused   5m25s
├──# revision:2
│  └──⧉ rollout-bluegreen-f4b655dcc            ReplicaSet  ✔ Healthy  20s    preview
│     ├──□ rollout-bluegreen-f4b655dcc-9zhr5   Pod         ✔ Running  20s    ready:1/1
│     └──□ rollout-bluegreen-f4b655dcc-cf7g2   Pod         ✔ Running  20s    ready:1/1
└──# revision:1
   └──⧉ rollout-bluegreen-5f49884f5c           ReplicaSet  ✔ Healthy  5m25s  stable,active
      ├──□ rollout-bluegreen-5f49884f5c-9d5xw  Pod         ✔ Running  5m25s  ready:1/1
      └──□ rollout-bluegreen-5f49884f5c-fh8zt  Pod         ✔ Running  5m25s  ready:1/1
执行argo rollouts promote命令后active指向了新版本,同时旧版本ReplicaSet在倒计时30s后自动ScaledDown,
只留下新版本的pod
# kubectl argo rollouts promote rollout-bluegreen
rollout 'rollout-bluegreen' promoted
[root@lianbang-xuexi-server24 argo-rollouts]# kubectl argo rollouts get rollout  rollout-bluegreen
Name:            rollout-bluegreen
Namespace:       default
Status:          ✔ Healthy
Strategy:        BlueGreen
Images:          argoproj/rollouts-demo:blue
                 argoproj/rollouts-demo:yellow (stable, active)
Replicas:
  Desired:       2
  Current:       4
  Updated:       2
  Ready:         2
  Available:     2

NAME                                           KIND        STATUS     AGE    INFO
⟳ rollout-bluegreen                            Rollout     ✔ Healthy  11m
├──# revision:2
│  └──⧉ rollout-bluegreen-f4b655dcc            ReplicaSet  ✔ Healthy  6m14s  stable,active
│     ├──□ rollout-bluegreen-f4b655dcc-9zhr5   Pod         ✔ Running  6m14s  ready:1/1
│     └──□ rollout-bluegreen-f4b655dcc-cf7g2   Pod         ✔ Running  6m14s  ready:1/1
└──# revision:1
   └──⧉ rollout-bluegreen-5f49884f5c           ReplicaSet  ✔ Healthy  11m    delay:26s
      ├──□ rollout-bluegreen-5f49884f5c-9d5xw  Pod         ✔ Running  11m    ready:1/1
      └──□ rollout-bluegreen-5f49884f5c-fh8zt  Pod         ✔ Running  11m    ready:1/1

# kubectl argo rollouts get rollout  rollout-bluegreen
Name:            rollout-bluegreen
Namespace:       default
Status:          ✔ Healthy
Strategy:        BlueGreen
Images:          argoproj/rollouts-demo:yellow (stable, active)
Replicas:
  Desired:       2
  Current:       2
  Updated:       2
  Ready:         2
  Available:     2

NAME                                           KIND        STATUS         AGE    INFO
⟳ rollout-bluegreen                            Rollout     ✔ Healthy      11m
├──# revision:2
│  └──⧉ rollout-bluegreen-f4b655dcc            ReplicaSet  ✔ Healthy      6m44s  stable,active
│     ├──□ rollout-bluegreen-f4b655dcc-9zhr5   Pod         ✔ Running      6m44s  ready:1/1
│     └──□ rollout-bluegreen-f4b655dcc-cf7g2   Pod         ✔ Running      6m44s  ready:1/1
└──# revision:1
   └──⧉ rollout-bluegreen-5f49884f5c           ReplicaSet  • ScaledDown   11m
      ├──□ rollout-bluegreen-5f49884f5c-9d5xw  Pod         ◌ Terminating  11m    ready:1/1
      └──□ rollout-bluegreen-5f49884f5c-fh8zt  Pod         ◌ Terminating  11m    ready:1/1
3.7 argo-rollouts金丝雀发布
# cat rollout-canary.yaml
# This example demonstrates a Rollout using the canary update strategy with a customized rollout
# plan. The prescribed steps initially sets a canary weight of 20%, then pauses indefinitely. Once
# resumed, the rollout performs a gradual, automated 20% weight increase until it reaches 100%.
apiVersion: argoproj.io/v1alpha1
kind: Rollout
metadata:
  name: rollout-canary
spec:
  replicas: 5
  revisionHistoryLimit: 2
  selector:
    matchLabels:
      app: rollout-canary
  template:
    metadata:
      labels:
        app: rollout-canary
    spec:
      containers:
      - name: rollouts-demo
        image: argoproj/rollouts-demo:blue
        imagePullPolicy: Always
        ports:
        - containerPort: 8080
  strategy:
    canary:
      canaryService: rollout-canary-preview
      stableService: rollout-canary-stable
      autoPromotionEnabled: false
      steps:
      - setWeight: 20
      # The following pause step will pause the rollout indefinitely until manually resumed.
      # Rollouts can be manually resumed by running `kubectl argo rollouts promote ROLLOUT`
      - pause: {}
      - setWeight: 40
      - pause: {duration: 40s}
      - setWeight: 60
      - pause: {duration: 20s}
      - setWeight: 80
      - pause: {duration: 20s}

---
kind: Service
apiVersion: v1
metadata:
  name: rollout-canary-preview
spec:
  selector:
    app: rollout-canary
  ports:
  - protocol: TCP
    port: 80
    targetPort: 8080

---
kind: Service
apiVersion: v1
metadata:
  name: rollout-canary-stable
spec:
  selector:
    app: rollout-canary
  ports:
  - protocol: TCP
    port: 80
    targetPort: 8080
- 主要关注的是
.spec.strategy处的配置,canary策略定义了8个step,pause后面没有带时间的话是一直处于Pause状态,通过promote可以激活。 setWeight: 20, 指的是20%的权重,5个副本的20%就是一个副本,先升级一个副本;后面的40、60、80分别对应2个副本、3个副本、4个副本。canaryService和stableService用于做流量分配,canaryService用于新版本流量,stableService用于旧版本流量;更换镜像后,会自动给 canaryService和stableService加上pod-template-hash, 用于区分新旧版本流量。
更换镜像为rollouts-demo:yellow,查看rollout详情,符合预期,卡在第二步(因为pause没有定义具体时间)
# kubectl argo rollouts set image rollout-canary "*=argoproj/rollouts-demo:yellow"

# kubectl argo rollouts get rollout rollout-canary
Name:            rollout-canary
Namespace:       default
Status:          ॥ Paused
Message:         CanaryPauseStep
Strategy:        Canary
  Step:          1/8
  SetWeight:     20
  ActualWeight:  20
Images:          argoproj/rollouts-demo:blue (stable)
                 argoproj/rollouts-demo:yellow (canary)
Replicas:
  Desired:       5
  Current:       5
  Updated:       1
  Ready:         5
  Available:     5

NAME                                        KIND        STATUS     AGE    INFO
⟳ rollout-canary                            Rollout     ॥ Paused   13m
├──# revision:2
│  └──⧉ rollout-canary-55bf57987b           ReplicaSet  ✔ Healthy  6m50s  canary
│     └──□ rollout-canary-55bf57987b-25z4z  Pod         ✔ Running  6m50s  ready:1/1
└──# revision:1
   └──⧉ rollout-canary-8545c4b6d8           ReplicaSet  ✔ Healthy  13m    stable
      ├──□ rollout-canary-8545c4b6d8-54rhh  Pod         ✔ Running  13m    ready:1/1
      ├──□ rollout-canary-8545c4b6d8-s27dr  Pod         ✔ Running  13m    ready:1/1
      ├──□ rollout-canary-8545c4b6d8-wz9lf  Pod         ✔ Running  13m    ready:1/1
      └──□ rollout-canary-8545c4b6d8-x9kkm  Pod         ✔ Running  13m    ready:1/1
执行promote后,stable指向了新版本,同时旧版本ReplicaSet在倒计时30s后自动ScaledDown
# kubectl argo rollouts promote rollout-canary
rollout 'rollout-canary' promoted

# kubectl argo rollouts get rollout rollout-canary
Name:            rollout-canary
Namespace:       default
Status:          ◌ Progressing
Message:         more replicas need to be updated
Strategy:        Canary
  Step:          2/8
  SetWeight:     40
  ActualWeight:  20
Images:          argoproj/rollouts-demo:blue (stable)
                 argoproj/rollouts-demo:yellow (canary)
Replicas:
  Desired:       5
  Current:       6
  Updated:       2
  Ready:         5
  Available:     5

NAME                                        KIND        STATUS               AGE  INFO
⟳ rollout-canary                            Rollout     ◌ Progressing        21m
├──# revision:2
│  └──⧉ rollout-canary-55bf57987b           ReplicaSet  ◌ Progressing        15m  canary
│     ├──□ rollout-canary-55bf57987b-25z4z  Pod         ✔ Running            15m  ready:1/1
│     └──□ rollout-canary-55bf57987b-57vsl  Pod         ◌ ContainerCreating  2s   ready:0/1
└──# revision:1
   └──⧉ rollout-canary-8545c4b6d8           ReplicaSet  ✔ Healthy            21m  stable
      ├──□ rollout-canary-8545c4b6d8-54rhh  Pod         ✔ Running            21m  ready:1/1
      ├──□ rollout-canary-8545c4b6d8-s27dr  Pod         ✔ Running            21m  ready:1/1
      ├──□ rollout-canary-8545c4b6d8-wz9lf  Pod         ✔ Running            21m  ready:1/1
      └──□ rollout-canary-8545c4b6d8-x9kkm  Pod         ✔ Running            21m  ready:1/1
# kubectl argo rollouts get rollout rollout-canary
Name:            rollout-canary
Namespace:       default
Status:          ✔ Healthy
Strategy:        Canary
  Step:          8/8
  SetWeight:     100
  ActualWeight:  100
Images:          argoproj/rollouts-demo:yellow (stable)
Replicas:
  Desired:       5
  Current:       5
  Updated:       5
  Ready:         5
  Available:     5

NAME                                        KIND        STATUS        AGE   INFO
⟳ rollout-canary                            Rollout     ✔ Healthy     23m
├──# revision:2
│  └──⧉ rollout-canary-55bf57987b           ReplicaSet  ✔ Healthy     16m   stable
│     ├──□ rollout-canary-55bf57987b-25z4z  Pod         ✔ Running     16m   ready:1/1
│     ├──□ rollout-canary-55bf57987b-57vsl  Pod         ✔ Running     114s  ready:1/1
│     ├──□ rollout-canary-55bf57987b-d2cb2  Pod         ✔ Running     68s   ready:1/1
│     ├──□ rollout-canary-55bf57987b-l7hkd  Pod         ✔ Running     43s   ready:1/1
│     └──□ rollout-canary-55bf57987b-cfpmk  Pod         ✔ Running     18s   ready:1/1
└──# revision:1
   └──⧉ rollout-canary-8545c4b6d8           ReplicaSet  • ScaledDown  23m
3.8 argo-rollouts滚动更新
canary策略中如果没定义steps等价于deployment的rolling-update
# cat rollout-rolling-update.yaml
# This example demonstrates how to use normal rolling update for a Rollout update strategy.
apiVersion: argoproj.io/v1alpha1
kind: Rollout
metadata:
  name: rollout-rollingupdate
spec:
  replicas: 5
  revisionHistoryLimit: 2
  selector:
    matchLabels:
      app: rollout-rollingupdate
  template:
    metadata:
      labels:
        app: rollout-rollingupdate
    spec:
      containers:
      - name: rollouts-demo
        image: argoproj/rollouts-demo:blue
        imagePullPolicy: Always
        ports:
        - containerPort: 8080
  strategy:
    # For a normal rolling update, simply specify the canary strategy without steps defined.
    # The maxSurge and maxUnavailable fields can be specified. If omitted, defaults to 25% and 0
    # respectively.
    canary:
      maxSurge: 1
      maxUnavailable: 1
3.8 argo-rollouts支持Ingress
目前argo-rollouts canary发布支持的ingress类型有:
- Ambassador
- AWS ALB
- lstio
- Nginx
- SMI (Service Mesh Interface)
以Nginx为例
# cat rollout-canary.yaml

---
kind: Service
apiVersion: v1
metadata:
  name: rollout-canary-preview
spec:
  selector:
    app: rollout-canary
  ports:
  - protocol: TCP
    port: 80
    targetPort: 8080

---
kind: Service
apiVersion: v1
metadata:
  name: rollout-canary-stable
spec:
  selector:
    app: rollout-canary
  ports:
  - protocol: TCP
    port: 80
    targetPort: 8080

---
# This example demonstrates a Rollout using the canary update strategy with a customized rollout
# plan. The prescribed steps initially sets a canary weight of 20%, then pauses indefinitely. Once
# resumed, the rollout performs a gradual, automated 20% weight increase until it reaches 100%.
apiVersion: argoproj.io/v1alpha1
kind: Rollout
metadata:
  name: rollout-canary
spec:
  replicas: 5
  revisionHistoryLimit: 2
  selector:
    matchLabels:
      app: rollout-canary
  template:
    metadata:
      labels:
        app: rollout-canary
    spec:
      containers:
      - name: rollouts-demo
        image: argoproj/rollouts-demo:blue
        imagePullPolicy: Always
        ports:
        - containerPort: 8080
  strategy:
    canary:
      trafficRouting:
        nginx:
          stableIngress: rollout-canary-stable
      canaryService: rollout-canary-preview
      stableService: rollout-canary-stable
      autoPromotionEnabled: false
      steps:
      - setWeight: 20
      # The following pause step will pause the rollout indefinitely until manually resumed.
      # Rollouts can be manually resumed by running `kubectl argo rollouts promote ROLLOUT`
      - pause: {duration: 20s}
      - setWeight: 40
      - pause: {duration: 20s}
      - setWeight: 60
      - pause: {duration: 20s}
      - setWeight: 80
      - pause: {duration: 20s}

---
apiVersion: networking.k8s.io/v1beta1
kind: Ingress
metadata:
  name: rollout-canary-stable
spec:
  rules:
  - host: rollouts-demo.local
    http:
      paths:
      - path: /
        backend:
          # Reference to a Service name, also specified in the Rollout spec.strategy.canary.stableService field
          serviceName: rollout-canary-stable
          servicePort: 80
创建完ingress后,rollouts controller会自动生成一个rollout-canary-rollout-canary-stable-canary的ingress,用于灰度发布的流量,
将流量导向rollout-canary-preview的service. 使用trafficRouting就得指定canaryService和stableService
# kubectl get ingress
NAME                                          CLASS    HOSTS                 ADDRESS         PORTS   AGE
rollout-canary-rollout-canary-stable-canary   <none>   rollouts-demo.local   10.19.255.156   80      25m
rollout-canary-stable                         <none>   rollouts-demo.local   10.19.255.156   80      25m
3.8 argo Analysis
上面的canary和bluegreen发布都是手动promote发布的,argo提供了类似Kayenta的自动化测试分析的工具, 能够在金丝雀或者蓝绿发布过程中自动进行分析测试,如果新版本测试不通过,则升级过程会自动终止并回滚到老版本。
测试指标来源支持:
- Prometheus: 根据prometheus的监控指标分析测试结果
- Kayenta: 通过kayenta工具分析
- Web: 接口测试,如果结果返回OK则测试通过,可以使用服务的健康检查接口进行测试。
- Job: 自定义一个Job进行测试,如果Job返回成功则测试通过。
- DataDog: 根据DataDog的监控指标分析测试结果
- NewRelic
- Wavefront
以Job指标来源为例:
# vim rollout-canary.yaml
apiVersion: argoproj.io/v1alpha1
kind: AnalysisTemplate
metadata:
  name: analysis-demo
spec:
  metrics:
  - name: analysis-demo
    interval: 10s
    failureLimit: 3
    provider:
      job:
        spec:
          backoffLimit: 0
          template:
            spec:
              containers:
              - name: test
                image: busybox
                imagePullPolicy: IfNotPresent
                command:
                - sh
                - -c
                - '[[ $(expr $RANDOM % 2) -eq 1 ]]'
              restartPolicy: Never

---
kind: Service
apiVersion: v1
metadata:
  name: rollout-canary
spec:
  selector:
    app: rollout-canary
  ports:
  - protocol: TCP
    port: 80
    targetPort: 8080

---
# This example demonstrates a Rollout using the canary update strategy with a customized rollout
# plan. The prescribed steps initially sets a canary weight of 20%, then pauses indefinitely. Once
# resumed, the rollout performs a gradual, automated 20% weight increase until it reaches 100%.
apiVersion: argoproj.io/v1alpha1
kind: Rollout
metadata:
  name: rollout-canary
spec:
  replicas: 5
  revisionHistoryLimit: 2
  selector:
    matchLabels:
      app: rollout-canary
  template:
    metadata:
      labels:
        app: rollout-canary
    spec:
      containers:
      - name: rollouts-demo
        image: argoproj/rollouts-demo:blue
        imagePullPolicy: Always
        ports:
        - containerPort: 8080
  strategy:
    canary:
      analysis:
        templates:
        - templateName: analysis-demo
      steps:
      - setWeight: 20
      # The following pause step will pause the rollout indefinitely until manually resumed.
      # Rollouts can be manually resumed by running `kubectl argo rollouts promote ROLLOUT`
      - pause: {duration: 20s}
      - setWeight: 40
      - pause: {duration: 20s}
      - setWeight: 60
      - pause: {duration: 20s}
      - setWeight: 80
      - pause: {duration: 20s}

---
apiVersion: networking.k8s.io/v1beta1
kind: Ingress
metadata:
  name: rollout-canary
spec:
  rules:
  - host: rollouts-demo.local
    http:
      paths:
      - path: /
        backend:
          # Reference to a Service name, also specified in the Rollout spec.strategy.canary.stableService field
          serviceName: rollout-canary
          servicePort: 80
更新镜像,观察rollout变化
# kubectl argo rollouts set image rollout-canary "*=argoproj/rollouts-demo:yellow"

# kubectl argo rollouts get rollout rollout-canary
3.9 argo-rollouts dashboard
4. Tips
1、删除tke registry镜像tag
# kubectl edit repositories.registry.tkestack.io -n rns-8lzfpvmd repo-85zxwtmv
编辑status字段,删除对应的tag
5. 参考链接
- https://tkestack.github.io/docs/installation/installation-architecture.html
- https://linkscue.com/posts/2019-09-18-kubernetes-local-volume-provisioner/
- https://argo-cd.readthedocs.io/en/stable/getting_started/
- 基于Jenkins和Argocd实现CI/CD
- Jenkinsfile example - 实现交互、clone 多个仓库以及 git push
- 【通俗易懂】蓝绿部署、滚动发布、灰度发布
- Kubernetes扩展神器Argo实践
- https://argoproj.github.io/argo-rollouts/installation/
- Canary deployment with Argo
「真诚赞赏,手留余香」
 爱折腾的工程师
真诚赞赏,手留余香
使用微信扫描二维码完成支付